Pi Kart Live!
ECE 5725
Thomas Chen (tcc78), Benjamin Xing (byx2).
Demonstration Video
Introduction
Pi Kart Live is an augmented reality game developed using the Lab 3 robot. We were inspired by the recent release of Nintendo’s Mario Kart Live: Home Circuit, a mixed-reality version of the popular Mario Kart series of video games. Instead of being situated in a purely virtual video game environment, the game involves a physical RC car with an attached first-person-view camera that can be raced around any indoor space. Only a few physical racetrack gates are required to be set up; everything else, including typical interactive Mario Kart items, are rendered onto the live camera feed in their real-world positions.
Our project emulates most of the features of Mario Kart Live, albeit with fewer resources at our disposal. The Lab 3 robot, called the Pi Kart, is controlled through VNC using arrow keys on a laptop. We attached a forward-facing camera to Pi Kart, which streams video to the laptop. Our racetrack “gates” consist of printed fiducial markers which encode game objects. When Pi Kart approaches these markers, it detects them and renders the game objects onto the screen; if it touches the object, Pi Kart will respond by changing its motion in a predefined fashion.
Objective
Pi Kart Live is our team’s exploration of the limits of embedded processing on a Raspberry Pi running a Linux distribution. Embedded processors have rapidly grown in power and capability in recent years, but so has the complexity of the tasks they execute. Computer vision, robotics, and real-time graphics are common tasks running in embedded systems such as smartphones and autonomous vehicles. We set out to learn more about optimizing complex workloads running on limited resources by combining elements from each of these fields into an interactive, game-ified project.
Design and Testing
The project was completed through several phases of development. These include the following: hardware, video streaming and GUI, robot control, marker detection and pose estimation, graphics rendering, and object interactions.
Hardware
The hardware components of our project include the Lab 3 robot setup, a Raspberry Pi Camera Module V2, and of course, the Raspberry Pi 4. Below is a brief description of each of these.
- Lab 3 robot: acrylic chassis, two (2) DC motors, TB6612FNG motor controller, two (2) robot wheels, one (1) caster wheel, 4-AA battery pack, 5V power bank, breadboard
- Raspberry Pi Camera Module V2: Sony IMX219 8-megapixel sensor, 1080p @ 30 fps, 720p @ 60 fps, CSI ribbon cable connection
- Raspberry Pi 4: 2-GB LPDDR4, quad-core ARM Cortex-A72 64-bit SoC @ 1.5 GHz, 2.4 GHz and 5.0 GHz IEEE 802.11ac wireless, 40-pin GPIO header, 2-land MIPI CSI camera port
Since the Lab 3 robot was already assembled at the start of the project, the only modification we had to make was connecting the ribbon cable of the Raspberry Pi camera module to the CSI camera port on the RPi. To keep the camera pointed forward and stabilized while the robot is in motion, we cut small pieces of cardboard or scrap balsa wood into an L-shape and taped the camera to the structure. We then used tape to secure the base of the camera mount to the surface of the breadboard at around the midsection of the Pi Kart. As in Lab 3, the RPi’s GPIO pins are attached to the breadboard via the Pi Cobbler breakout, while the motors are interfaced to the 4-AA battery pack and GPIO pins through the motor controller. The RPi runs off of the 5V power bank so that its power supply is separate from that of the motors. The completed hardware setup is pictured in Figure 1.
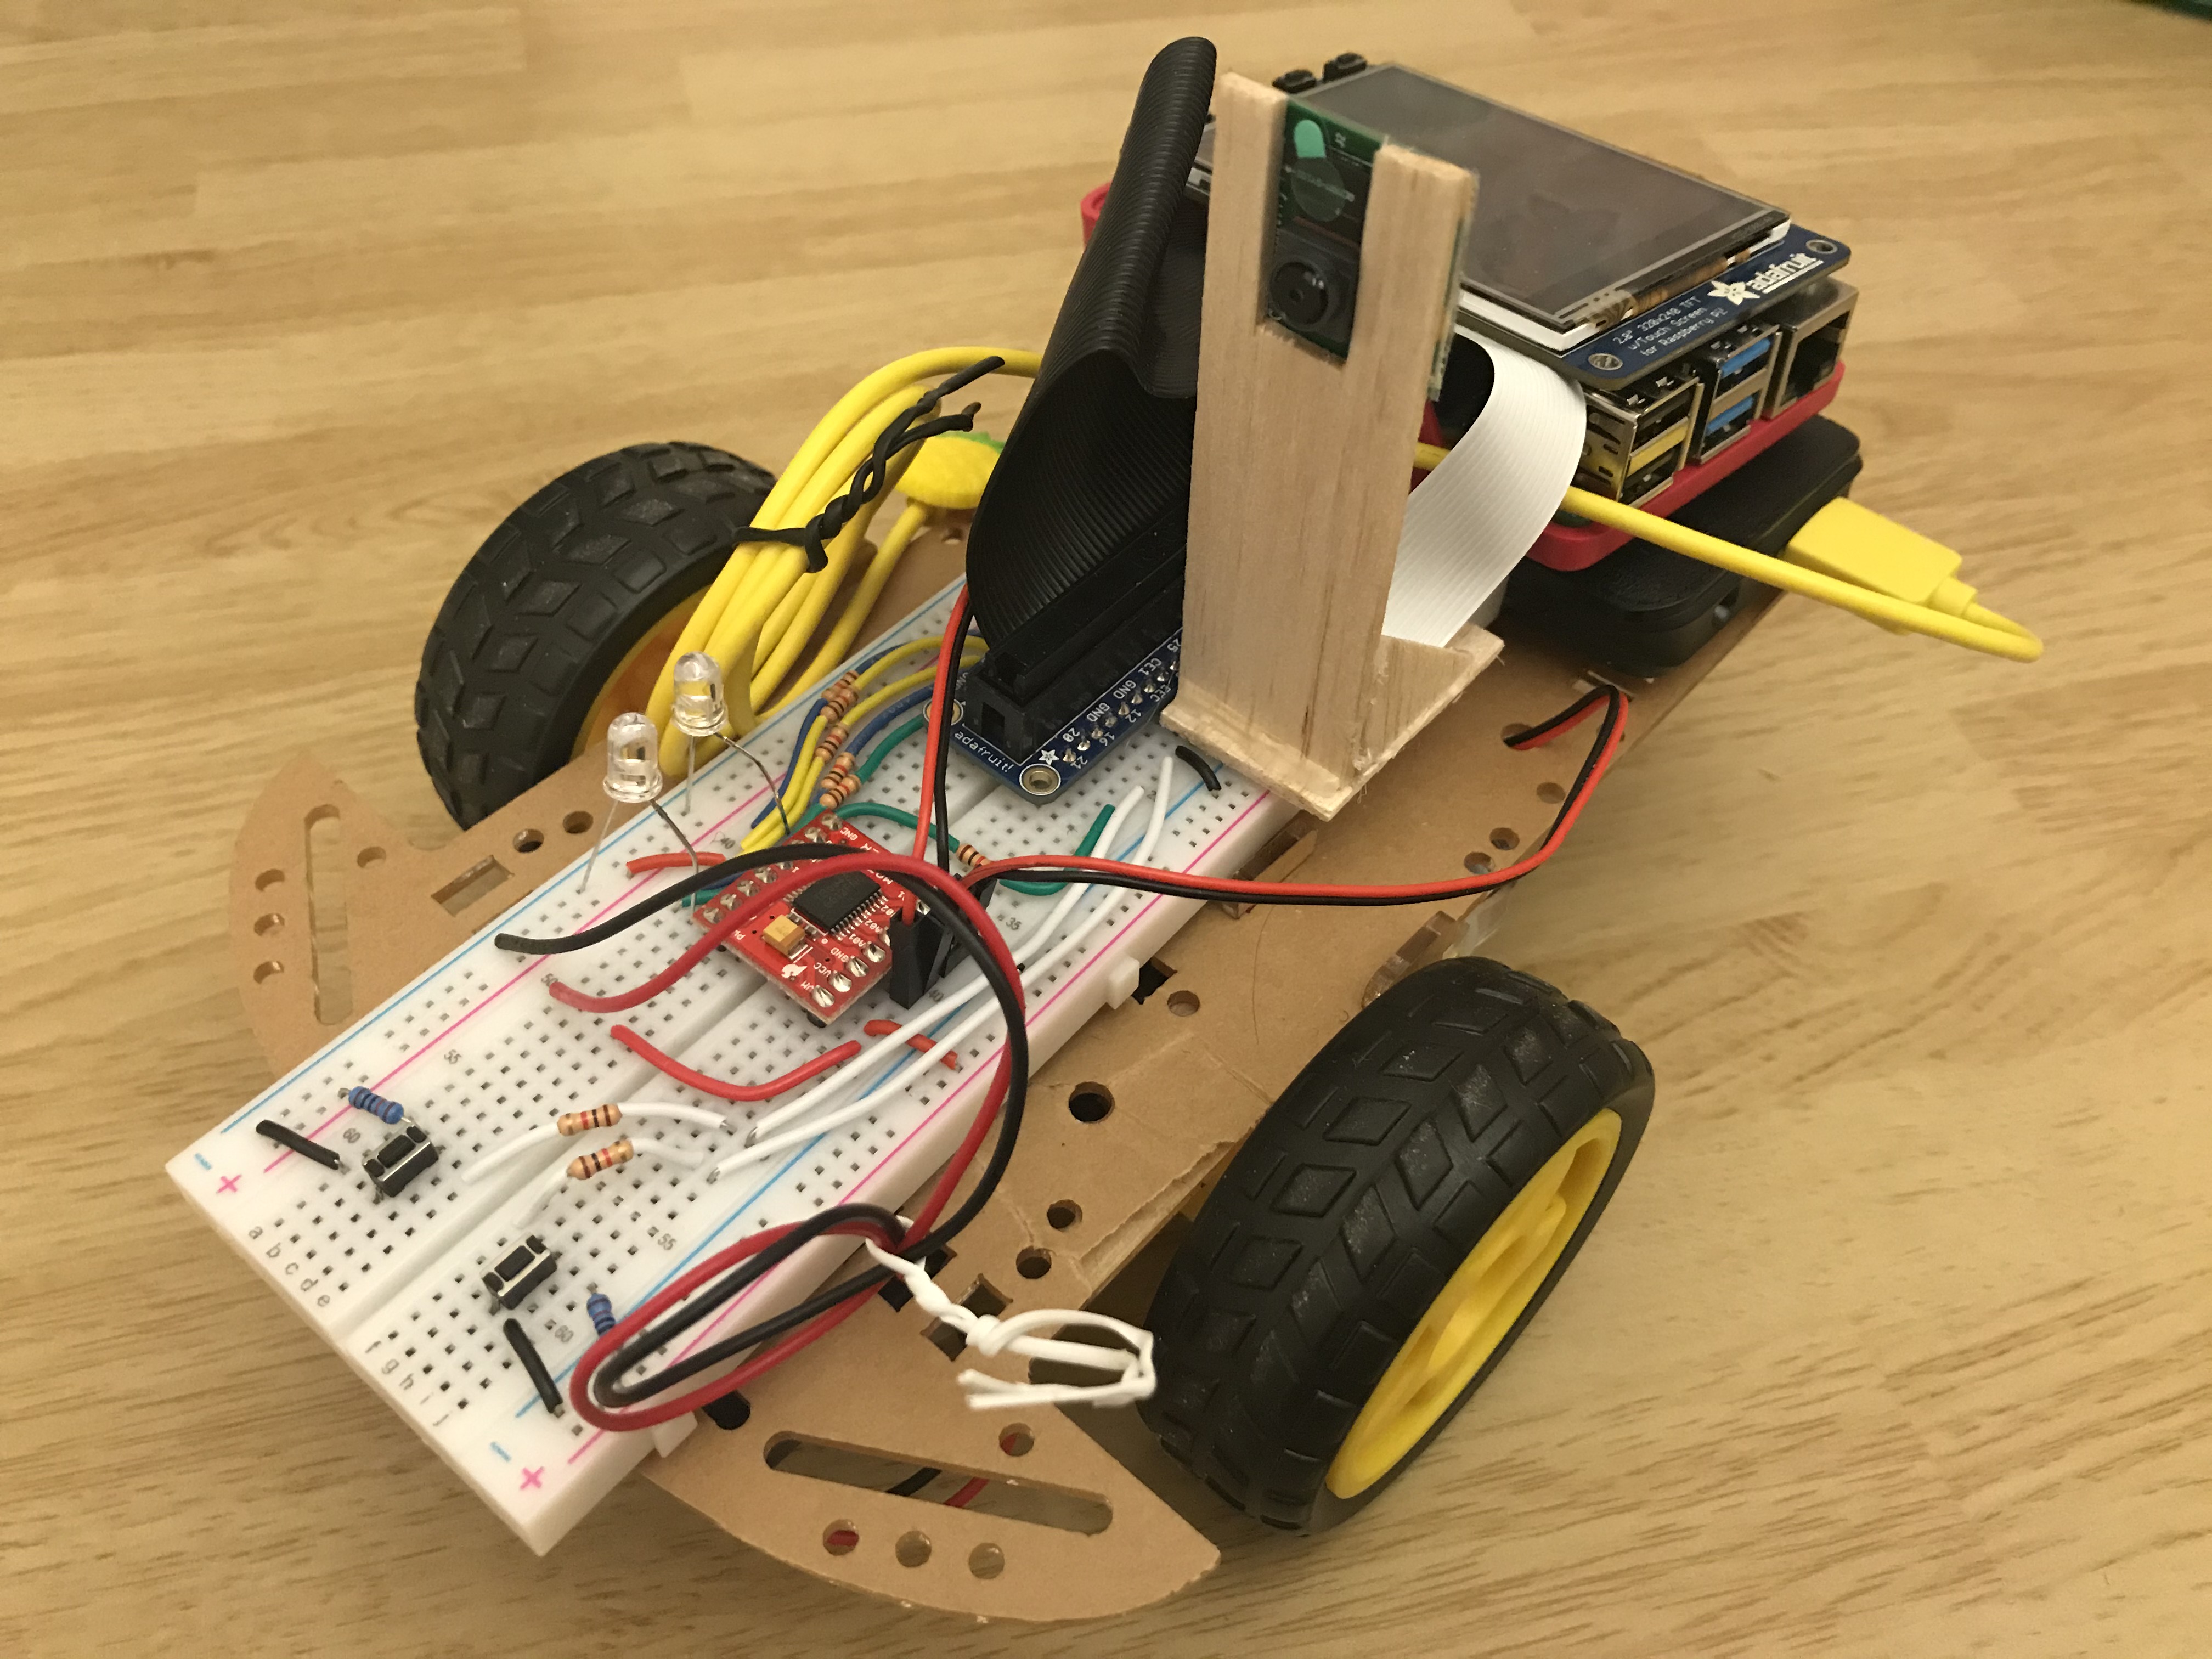
Figure 1: Assembled robot
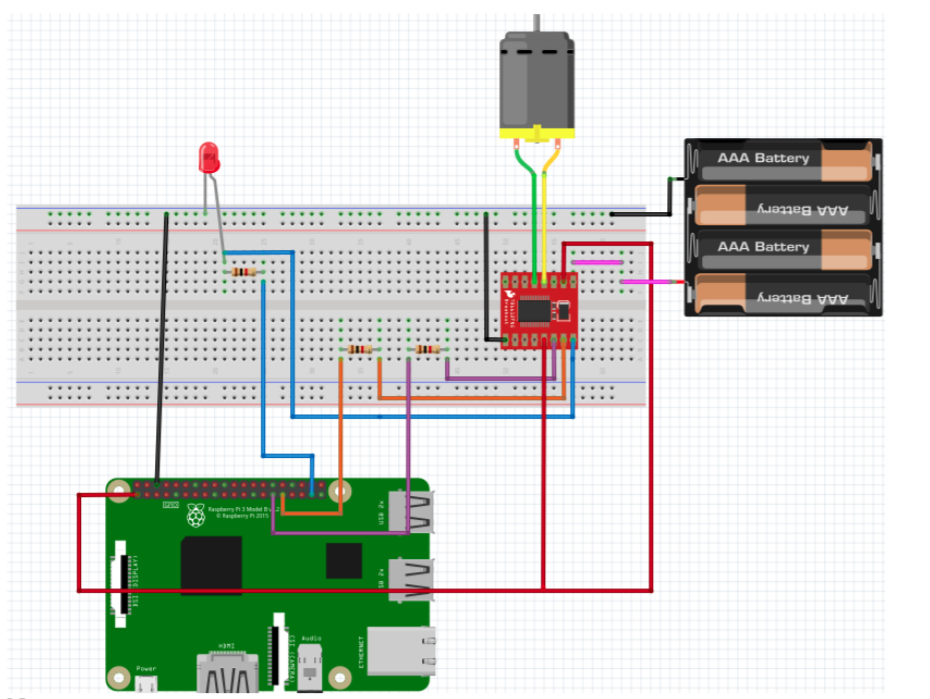
Figure 2: Robot wiring diagram
Video streaming and GUI
Since the robot is mobile and headless (i.e., unconnected to a monitor or other desktop peripherals), we used VNC Viewer to see the Raspbian desktop and run the application. After logging into the RPi using the command line, the VNC connection is initialized using the command “vncserver”.
The camera can be set up by enabling the camera port in the OS settings and installing the picamera module to access the camera using a Python script. We initialized the camera by instantiating a PiCamera object, and we can grab the current frame from the camera by using the .read() function on the camera’s RGB array.
Since a video stream is a sequence of still images at a high frame rate, we can use a loop to grab the image from the camera and then display the image on each iteration. We used Pygame to display the images on the screen since it works well with the OpenGL graphics library and it provides an easy way to enhance the game UI. The image is displayed on the screen on every loop iteration by calling the display.flip() function.
One problem we encountered was a very low frame rate at around 10 frames per second (fps). When we researched the issue a bit further, we discovered that the I/O of reading data from the camera hardware on each loop iteration was slow and was likely causing a bottleneck. To address this issue, we spawn a second thread whose only responsibility is reading the data from the camera hardware into a buffer. That way, when the main video processing thread needs the next frame, it can simply grab the most current frame from the buffer instead of waiting for the camera hardware. Since other people had run into this issue in the past, we used the PiVideoStream module in the imutils package to spawn the worker thread, following the PyImageSearch tutorial as a reference [1].
We tested the frame rate of the new setup by recording the average time between each loop iteration and found that the optimization speeds up the video stream to about 50 fps, greatly increasing the playability of the game. The camera captured images at 320x240p resolution, and the Pygame window was displayed at 640x480p resolution. This caused the display to be somewhat blurry, but it was a necessary tradeoff as a higher camera resolution would have increased the latency by too much.
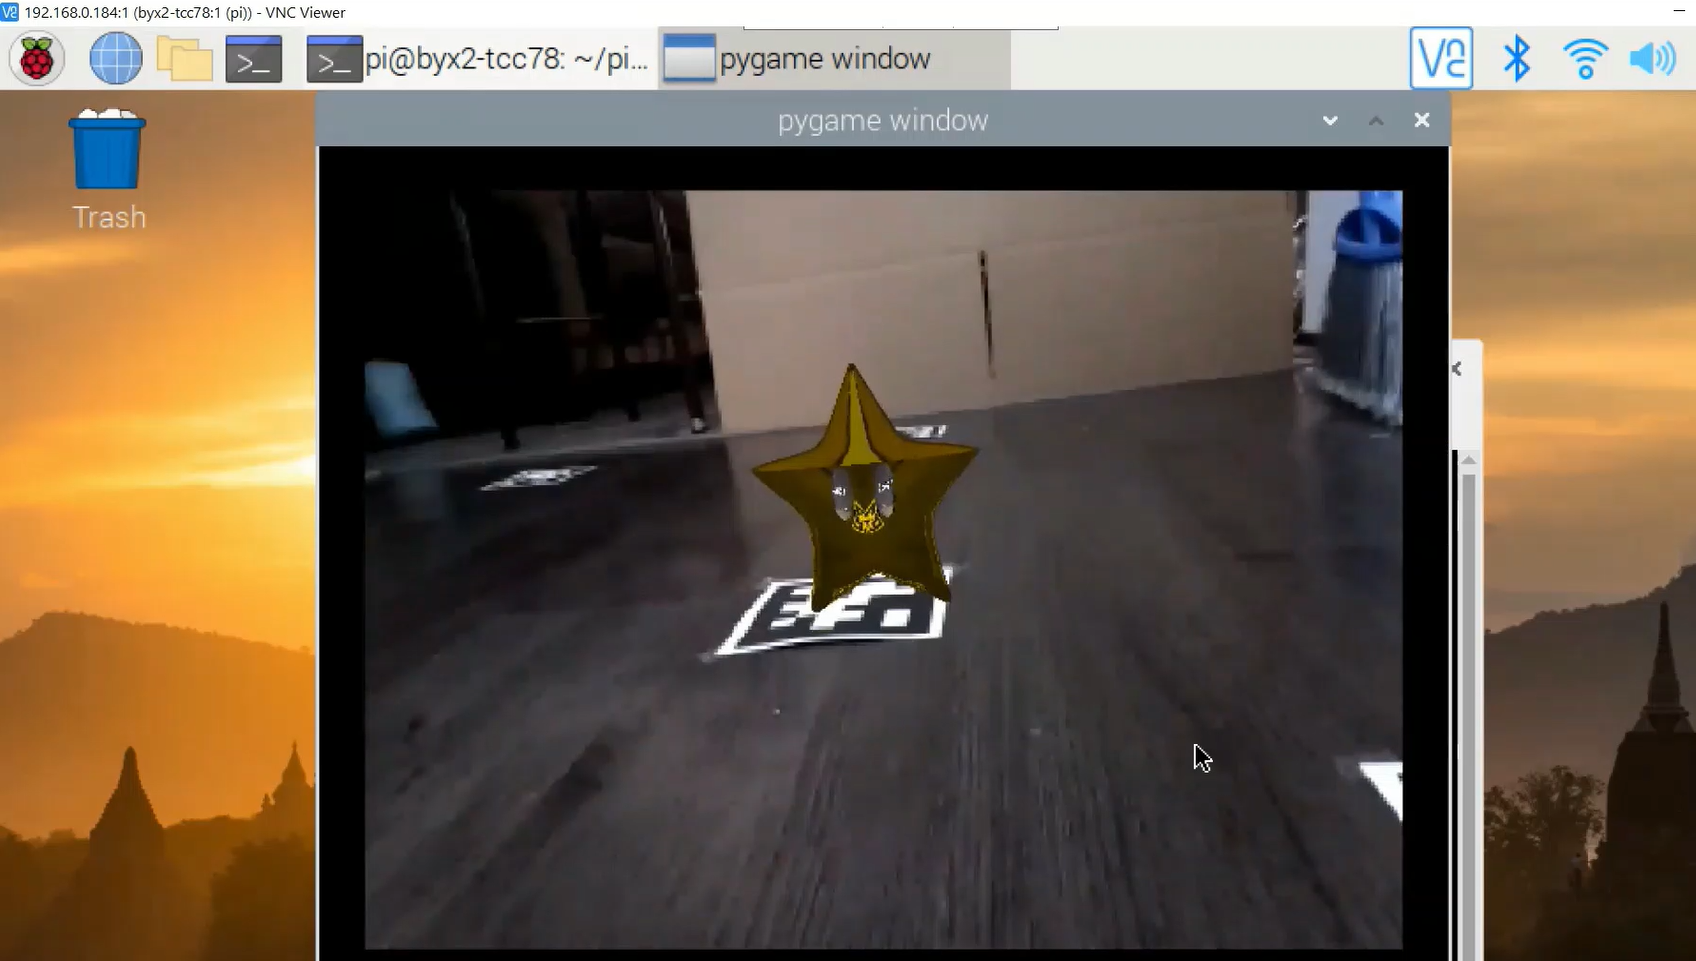
Figure 3: Video Stream
Robot Control - pikartcontrol.py
To control the robot, we needed a way to handle the player’s keyboard inputs and respond to them in real time. At first, we tried using various keyboard libraries like those in the pynput package, but these did not work through VNC since keystrokes are sent as text strings instead of OS events. However, we realized that Pygame was able to respond to keystrokes through its event queue despite being run through VNC, and conveniently we were already using it for video streaming.
Pygame typically responds to user input on every frame by polling the events queue in a for-loop; however, this was not optimal for our purposes since we did not want user input processing to suffer an unbounded delay in the main loop which would be running heavy vision and graphics tasks. Thus, we decided to spawn another separate thread that is dedicated to polling the Pygame events queue with a time.sleep(0.02) between every loop iteration to avoid completely consuming a processor while still maintaining decent responsiveness.

Figure 4: Robot response to keyboard input
Robot control logic was implemented in the pikartcontrol module using code from Lab 3 to handle motor GPIO control and provide high level functions. We made use of a hierarchy of object-oriented classes to provide maximal modularity and flexibility. The MyMotor class is at the lowest level and interfaces directly with the two digital directional control pins and the PWM pin of the motor. On top of that is the PiKart class, which has two MyMotor objects as attributes; this class handles overall robot movement, including tracking the robot’s state. Finally, the PiKartController class responds to events by binding callback functions to user inputs and object interactions.
Marker Detection and Pose Estimation - pikartdetector.py
The fiducial markers we chose for our project are called Apriltags, which were developed by researchers at the University of Michigan specifically for robotics, augmented reality, and camera calibration applications. Apriltags are similar to QR codes but are simpler as they are not meant for encoding large amounts of information. We printed them out and placed them around the “racetrack” to localize game objects. Since Apriltags are an established system in computer vision, we made use of readily available, optimized detector code for our project [2]. The detector finds all instances of the tag in a grayscale image and returns the image coordinates of the four corner points.
Since we need to render the game objects in the correct positions and determine whether the robot hit one of the objects, we need to be able to find the position and orientation of Pi Kart (specifically the camera mounted on Pi Kart) relative to the tag. This process is called pose estimation, and it involves finding a linear mapping from 2D image space to 3D world space. First, however, we need to determine the intrinsic parameters of the camera, such as the focal length, aspect ratio, and distortion; this is called camera calibration. We used built-in functions in OpenCV to perform camera calibration by taking a series of images of a checkerboard at various distances and orientations and regressing to the intrinsic camera parameters. To automate the process, we adapted some code we found from an online resource [3].
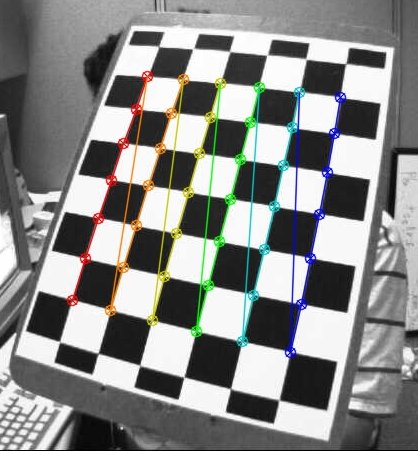
Figure 5: Camera calibration
After finding the intrinsic camera parameters, we can pass these into another OpenCV function called solvePnP. This function also takes in the set of image points for the tag corners along with the corresponding set of 3D world points and performs pose estimation by guessing a mapping matrix and minimizing the error between the image points computed from the world points and the actual image points. The function returns rvecs and tvecs, which are the rotation and translation vectors, respectively. These represent the position and orientation of the camera in the units used to define the set of object world points. The translation vector can be directly used to compute the Euclidean distance of Pi Kart to the detected tag while the rotation and translation vectors can be composed into a view matrix for graphics rendering.
Rendering of Virtual 3D Models - pikartgraphics.py
We used OBJ files as the 3D models, which define a set of vertices and faces defined by those vertices. We had a total of four models implemented - the banana, the star, the arrows, and the checkered flag. The banana would stop the PiKart in its tracks if it touches it, the star would boost the PiKart forward, the arrows signaled which direction the PiKart should drive to progress forward on the track, and the finish flag would indicate the end of the track. To help the Pi run more smoothly, we decimated the banana model in Blender to reduce the number of faces and vertices it had, creating a low poly model. This way it would be faster for the object to be rendered every frame.
We used openGL to render the OBJ files. Pygame has a page on the wiki on how to convert an OBJ file to an openGL display list. We also found a tutorial for displaying OBJ models on fiducial tags [4]. Both these resources use an older version of openGL that has since been deprecated, however, they are the only relevant resources we have found, and since this was our first time using openGL, we thought it would be more feasible to use a tutorial as a base and build on that, given the time constraints. In our openGL loop, we would get the image from the camera, convert it into an openGL texture and draw it as the background. When one or more Apriltags are detected in the image, we would loop through them and create a view matrix based on the rvecs and tvecs returned from pose estimation. We would then use the openGL display list of the corresponding OBJ we want to display, and draw it on top of the background texture.
Since the vertices of objects are defined in object space, not in world space, it was necessary to refine the view matrix by trial and error. This involved adding more transform matrices to the stack, including translations to move the object to the right position, rotations to orient the object upright, and scaling to make the object the right size. Although OpenGL handled the majority of the complexity like z-buffering and shading, manually adjusting the view matrix was still a tedious and fickle process. It is possible that the modern version of OpenGL would have made this easier.
Figure 6: banana
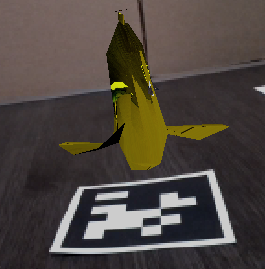
Figure 7: star
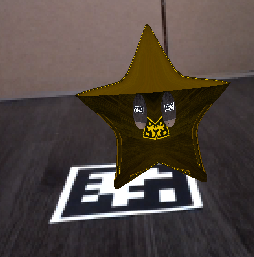
Figure 8: flag
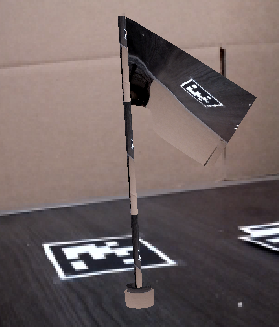
Figure 9: arrow
Object Interactions - pikartinteractions.py
To make the game interactive in both the virtual game environment and in reality, we program Pi Kart to respond to collisions with virtual game objects as defined above. Since we were constrained by the project deadline, we were only able to implement two types of object interactions, one with the banana and the other with the star. When Pi Kart hits the banana, it is stopped for 2 seconds and user keyboard inputs are ignored. When it hits the star, it will shoot forward at full speed (both motors at 100% duty cycle) for 1 second; again, user inputs are ignored during this time.
We define a collision event using the tvecs from pose estimation. We compute the distance using tvecs by taking the L2-norm of the x, y, and z-axis translations. Since Pi Kart will never be able to detect that it is right on the object (it will cover the Apriltag at that point), we set a distance threshold under which the collision event is triggered. Since the robot control code is running in a separate thread, we use the Event class from the Threading library to communicate between different threads. When a collision is detected, the Event flag corresponding to either the banana or the star is set, and code within the PiKartController class will check if these flags are set. When it finds a set flag, it will clear the flag and enter into a callback to handle the event, producing the behavior described above.
Final Synthesis - pikart.py
The top module connects all of the supporting code described above. First, it instantiates the camera and sets up the video streaming thread as well as all the supporting classes. Then, it spawns the Pi Kart control thread which enables user input. Next, it initializes the Pygame window and enters the main loop, grabbing images from the buffer. The first step is passing the image to the Apriltag detector. When the results are available, graphics processing begins and renders the image to the screen. Finally, object interactions are handled, and the loop begins another iteration.
We tested the combined system by setting up a racetrack around the house with Apriltags and driving the car around. We checked if detections were working properly by printing out the boolean for whether a tag was found in the image; we moved the tag around to test the camera’s limits at 320p. To test pose estimation, we started off by drawing very simple objects like a set of coordinate axes or a wireframe cube directly aligned with the tag. Finally, we check whether the robot responds to object collisions correctly by driving it as close to the tag as possible and observing the physical robot’s behavior.
Results
We were able to meet most of the objectives we set for the project. We managed to control the Pi Kart remotely from our laptops and receive the video stream via WiFi. The Pi Kart was able to drive around a real world environment and render virtual objects on the screen. However, there were certainly elements of the project that could be improved. One issue was that the Pi Kart had to get relatively close to the fiducial marker before it could detect it. This could be remedied by printing out larger markers, but for the purposes of this project we decided to keep what we had already printed. We also encountered a small bug with the texture of the objects being rendered, where the surrounding background texture would also be applied to the model. Instead of rendering just the diffuse color components, the objects would look oddly reflective with parts of the background texture. This was our first time using openGL, and so we had trouble fixing this bug.
Conclusion
Overall the project mostly achieved its goals. We learned what the Raspberry Pi is capable of executing and how workloads can be optimized to make better use of the hardware, such as using multithreading to reduce I/O latency. The final project had no significant bugs and we used the software design principles of modularity, hierarchy, and extensibility to write organized and maintainable code. Ultimately, the shortcomings stemmed mainly from three sources: hardware limitations, environmental factors, and time limitations.
The hardware placed limitations on how much we could accomplish. Even though the Raspberry Pi is a quad-core processor, it still was not fast enough to perform both computer vision and graphics tasks to achieve a smooth gaming experience. While the game was certainly playable, there were noticeable times where there would be dropped frames and a slowdown. It also did not help that the camera resolution was so low, which was another direct consequence of the RPi’s limited processing power. Moreover, the motion of the Pi Kart caused the image to become blurry, meaning that we had trouble detecting tags while moving as we originally intended. One thing we tried was having the aprilTags be upright; however, that did not help much to improve detection. Environmental factors, most notably lighting, also made the performance a bit unpredictable. In lower light conditions, the camera has trouble detecting the tag, while bright lights might cause it to become overexposed. Finally, time constraints meant that we ran out of time to debug the texture issue and to refine the view matrices for each of the objects.
Future Work
Future work could include adding more objects. These could be obstacles in addition to bananas, for example fences that block a portion of the road, or another object that grants invincibility to the driver, so that bananas don’t stop them. Long term future work could be learning modern openGL to be able to update it to the current version, and fix the texture bug we encountered as well. Also, it was clear that the Raspberry Pi hardware became a bottleneck for a better gaming experience, so it would be interesting to explore hardware acceleration. We considered having the Raspberry Pi only be responsible for streaming the video to our laptop and then running tag detection, pose estimation, and graphics on our laptop hardware, but we decided that this would defeat the purpose of the Raspberry Pi as an embedded system. However, using an embedded GPU in combination with the RPi to help with the vision and graphics might be something to try in the future (Nvidia’s Jetson Nano is an example). Another option might be to create a custom FPGA accelerator that helps with video processing.
Work Distribution

Thomas
tcc78@cornell.edu
Worked on the virtual objects rendering, object OBJs, camera calibration, and AprilTags. Also set up a working PiKart, and helped Ben test PiKart implementation.
Ben
byx2@cornell.edu
Worked on controls for the PiKart, camera calibration, AprilTags, and virtual object interactions. Also set up a working PiKart and helped Thomas with virtual objects.
Parts List
- Lab 3 Robot - provided by instructor
- Raspberry Pi Camera V2 - $25.00
- Raspberry Pi 4 - $35.00
Total: $60.00
References
[1] Pyimagesearch increasing framerate[2] April Tags
[3] Camera Calibration
[4] AR OpenGL Tutorial
Banana Peel OBJ
Arrow OBJ
Star OBJ
Flag OBJ
Code Appendix
#pikart.py
from picamera.array import PiRGBArray
from picamera import PiCamera
from OpenGL.GL import *
from OpenGL.GLUT import *
from OpenGL.GLU import *
import cv2
from PIL import Image
import numpy as np
import time
import cv2
import numpy as np
import apriltag
from imutils.video.pivideostream import PiVideoStream
from imutils.video import FPS
import imutils
from threading import Thread
from threading import Event
import os
import RPi.GPIO as GPIO
import time
from pynput import keyboard
import pygame
from pygame.locals import *
from pikartpkg.pikartcontrol import *
from pikartpkg.pikartgraphics import *
from pikartpkg.pikartdetector import *
from pikartpkg.pikartinteractions import *
from pikartpkg.objloader import *


def main():
    vs = PiVideoStream(resolution=(320,240), framerate=30).start()
    time.sleep(2.0)
    fps = FPS().start()

    pygame.init()
    size = width, height = 640,480
    pygame.display.set_mode(size, DOUBLEBUF|OPENGL)

    GPIO.setmode(GPIO.BCM)

    PWM_FREQ = 1000

    left_motor = MyMotor(I1_pin=6, I2_pin=5, PWM_pin=21)
    right_motor = MyMotor(I1_pin=13, I2_pin=19, PWM_pin=26)
    left_motor.init(PWM_FREQ)
    right_motor.init(PWM_FREQ)

    my_kart = PiKart(left_motor, right_motor)
    my_controller = PiKartController(my_kart)

    my_graphics = PiKartGraphics()
    my_detector = PiKartDetector()
    my_interactions = PiKartInteractions()

    quit_ev = Event()
    banana_ev = Event()
    star_ev = Event()

    controller_args = (my_controller, quit_ev, banana_ev, star_ev)
    pikartcontrol_thread = Thread(target=pikart_control, args=controller_args).start()

    while not quit_ev.isSet():
        image = vs.read()

        my_graphics.clear_buffers()
        my_graphics.draw_background(image)
        results = my_detector.detect_tags(image)
        for r in results:
            rvecs, tvecs = my_detector.estimate_pose(r)
            hit = my_interactions.check_collision(tvecs)
            if hit:
                my_interactions.hit_event(r.tag_id, banana_ev, star_ev)
            view_matrix = my_detector.get_view(rvecs, tvecs)
            my_graphics.draw_obj(view_matrix, r.tag_id)

        pygame.display.flip()


    left_motor.cleanup()
    right_motor.cleanup()
    GPIO.cleanup()

if __name__ == "__main__":
    main()
#pikartpkg/pikartcontrol.py
# Pi Kart Control
# Benjamin Xing (byx2), Thomas Chen (tcc78)

import os
import RPi.GPIO as GPIO
import time
from pynput import keyboard
import pygame

# MyMotor class
class MyMotor(object):
    def __init__(self, I1_pin, I2_pin, PWM_pin):
        self.I1_pin = I1_pin
        self.I2_pin = I2_pin
        self.PWM_pin = PWM_pin

    def init(self, PWM_freq=1000):
        GPIO.setup(self.I1_pin, GPIO.OUT)
        GPIO.setup(self.I2_pin, GPIO.OUT)
        GPIO.setup(self.PWM_pin, GPIO.OUT)

        GPIO.output(self.I1_pin, GPIO.LOW)
        GPIO.output(self.I2_pin, GPIO.LOW)
        self.p = GPIO.PWM(self.PWM_pin, PWM_freq)
        self.p.start(0)
        self.status = 'stop'
        self.dc = 0

    def stop(self):
        GPIO.output(self.I1_pin, GPIO.LOW)
        GPIO.output(self.I2_pin, GPIO.LOW)
        self.p.ChangeDutyCycle(0)
        self.status = 'stop'
        self.dc = 0

    def brake(self):
        GPIO.output(self.I1_pin, GPIO.HIGH)
        GPIO.output(self.I2_pin, GPIO.HIGH)
        self.p.ChangeDutyCycle(0)
        self.status = 'stop'
        self.dc = 0

    def set_cw(self):
        GPIO.output(self.I1_pin, GPIO.HIGH)
        GPIO.output(self.I2_pin, GPIO.LOW)
        self.status = 'cw'

    def set_ccw(self):
        GPIO.output(self.I1_pin, GPIO.LOW)
        GPIO.output(self.I2_pin, GPIO.HIGH)
        self.status = 'ccw'

    def set_speed(self, dc=0):
        self.dc = dc
        self.p.ChangeDutyCycle(dc)

    def cleanup(self):
        self.stop()
        self.p.stop()

# PiKart class
class PiKart(object):
    def __init__(self, left_motor, right_motor):
        self.left_motor = left_motor
        self.right_motor = right_motor
        self.forward = False
        self.backward = False
        self.left = False
        self.right = False

    def set_forward(self):
        if not self.backward:
            self.forward = True

    def set_backward(self):
        if not self.forward:
            self.backward = True

    def set_right(self):
        if not self.left:
            self.right = True

    def set_left(self):
        if not self.right:
            self.left = True

    def clear_forward(self):
        self.forward = False

    def clear_backward(self):
        self.backward = False

    def clear_right(self):
        self.right = False

    def clear_left(self):
        self.left = False

    def clear_all(self):
        self.forward = False
        self.backward = False
        self.right = False
        self.left = False

    def update_state(self):
        if self.forward or self.backward:
            if self.forward:
                self.left_motor.set_ccw()
                self.right_motor.set_ccw()
            else:
                self.left_motor.set_cw()
                self.right_motor.set_cw()
            if self.right:
                self.left_motor.set_speed(80)
                self.right_motor.set_speed(40)
            elif self.left:
                self.left_motor.set_speed(40)
                self.right_motor.set_speed(80)
            else:
                self.left_motor.set_speed(60)
                self.right_motor.set_speed(60)
        elif self.right or self.left:
            if self.right:
                self.left_motor.set_ccw()
                self.right_motor.set_cw()
            else:
                self.left_motor.set_cw()
                self.right_motor.set_ccw()
            self.left_motor.set_speed(20)
            self.right_motor.set_speed(20)
        else:
            self.left_motor.stop()
            self.right_motor.stop()

# PiKartController class
class PiKartController(object):
    def __init__(self, my_kart):
        self.my_kart = my_kart
    def ON_PRESS_UP_KEY(self):
        self.my_kart.set_forward()
        self.my_kart.update_state()
    def ON_PRESS_DOWN_KEY(self):
        self.my_kart.set_backward()
        self.my_kart.update_state()
    def ON_PRESS_LEFT_KEY(self):
        self.my_kart.set_left()
        self.my_kart.update_state()
    def ON_PRESS_RIGHT_KEY(self):
        self.my_kart.set_right()
        self.my_kart.update_state()
    def ON_RELEASE_UP_KEY(self):
        self.my_kart.clear_forward()
        self.my_kart.update_state()
    def ON_RELEASE_DOWN_KEY(self):
        self.my_kart.clear_backward()
        self.my_kart.update_state()
    def ON_RELEASE_LEFT_KEY(self):
        self.my_kart.clear_left()
        self.my_kart.update_state()
    def ON_RELEASE_RIGHT_KEY(self):
        self.my_kart.clear_right()
        self.my_kart.update_state()
    def handle_banana(self):
        time.sleep(0.5)
        self.my_kart.clear_all()
        self.my_kart.update_state()
        time.sleep(2)
    def handle_star(self):
        time.sleep(0.5)
        self.my_kart.left_motor.set_ccw()
        self.my_kart.right_motor.set_ccw()
        self.my_kart.left_motor.set_speed(100)
        self.my_kart.right_motor.set_speed(100)
        time.sleep(1)
        self.my_kart.update_state()


def pikart_control(my_controller, quit_ev, banana_ev, star_ev):
    quit = False

    while not quit:
        if banana_ev.isSet():
            banana_ev.clear()
            my_controller.handle_banana()
        elif star_ev.isSet():
            star_ev.clear()
            my_controller.handle_star()
        for event in pygame.event.get():
            if event.type == pygame.QUIT:
                quit = True
                quit_ev.set()
            elif event.type == pygame.KEYDOWN:
                if event.key == pygame.K_q:
                    quit = True
                elif event.key == pygame.K_UP:
                    my_controller.ON_PRESS_UP_KEY()
                elif event.key == pygame.K_DOWN:
                    my_controller.ON_PRESS_DOWN_KEY()
                elif event.key == pygame.K_LEFT:
                    my_controller.ON_PRESS_LEFT_KEY()
                elif event.key == pygame.K_RIGHT:
                    my_controller.ON_PRESS_RIGHT_KEY()
            elif event.type == pygame.KEYUP:
                if event.key == pygame.K_UP:
                    my_controller.ON_RELEASE_UP_KEY()
                elif event.key == pygame.K_DOWN:
                    my_controller.ON_RELEASE_DOWN_KEY()
                elif event.key == pygame.K_LEFT:
                    my_controller.ON_RELEASE_LEFT_KEY()
                elif event.key == pygame.K_RIGHT:
                    my_controller.ON_RELEASE_RIGHT_KEY()

        time.sleep(0.02)

if __name__ == "__main__":

    pygame.init()
    size = width, height = 320,240
    screen = pygame.display.set_mode(size)

    GPIO.setmode(GPIO.BCM)

    PWM_FREQ = 1000

    left_motor = MyMotor(I1_pin=6, I2_pin=5, PWM_pin=21)
    right_motor = MyMotor(I1_pin=13, I2_pin=19, PWM_pin=26)
    left_motor.init(PWM_FREQ)
    right_motor.init(PWM_FREQ)

    my_kart = PiKart(left_motor, right_motor)
    my_controller = PiKartController(my_kart)

    pikart_control(my_controller)

    left_motor.cleanup()
    right_motor.cleanup()
    GPIO.cleanup()
#pikartpkg/pikartdetector.py
# pikartdetector module
import cv2
import numpy as np
import apriltag

class PiKartDetector:

    INVERSE_MATRIX = np.array([[ 1.0, 1.0, 1.0, 1.0],
                               [-1.0,-1.0,-1.0,-1.0],
                               [-1.0,-1.0,-1.0,-1.0],
                               [ 1.0, 1.0, 1.0, 1.0]])


    cameraMtx = np.float64([[2.513094328143414486e+02,0.000000000000000000e+00,1.601992589556834616e+02],
                  [0.000000000000000000e+00,2.514130484254488351e+02,1.161301337521873194e+02],
                  [0.000000000000000000e+00,0.000000000000000000e+00,1.000000000000000000e+00]])
    cameraDist = np.float64([[1.489051652270992343e-01,-1.023400131740569013e-01,7.818003138031203456e-04,
                    1.021523873811514151e-04,-5.495448438241943290e-01]])
    objp = np.float32([ [-1, -1,  0],
                        [ 1, -1,  0],
                        [ 1,  1,  0],
                        [-1,  1,  0] ])

    def __init__(self):
        self.options = apriltag.DetectorOptions(families="tag36h11")
        self.detector = apriltag.Detector(self.options)

    def detect_tags(self, image):
        gray = cv2.cvtColor(image, cv2.COLOR_BGR2GRAY)
        results = self.detector.detect(gray)
        return results

    def estimate_pose(self, result):
        corners_float32 = result.corners.astype(np.float32)
        corners_float32 = corners_float32[:, np.newaxis, :]
        retval, rvecs, tvecs = cv2.solvePnP(self.objp, corners_float32, self.cameraMtx, self.cameraDist)
        return rvecs, tvecs

    def get_view(self, rvecs, tvecs):
        rmtx = cv2.Rodrigues(rvecs)[0]
        tvecs = tvecs.ravel()
        view_matrix = np.array([[rmtx[0][0],rmtx[0][1],rmtx[0][2],tvecs[0]],
                                [rmtx[1][0],rmtx[1][1],rmtx[1][2],tvecs[1]],
                                [rmtx[2][0],rmtx[2][1],rmtx[2][2],tvecs[2]],
                                [0.0       ,0.0       ,0.0       ,1.0    ]])

        view_matrix = view_matrix * self.INVERSE_MATRIX
        view_matrix = np.transpose(view_matrix)
        return view_matrix
# pikartpkg/pikartgraphics.py
# pikartgraphics

from OpenGL.GL import *
from OpenGL.GLUT import *
from OpenGL.GLU import *
from . objloader import *
from PIL import Image
import cv2
import pygame

class PiKartGraphics:

    def __init__(self):
         # initialise texture
        self.texture_background = None
        self.obj = {}

        glClearColor(0.0, 0.0, 0.0, 0.0)
        glClearDepth(1.0)
        glDepthFunc(GL_LESS)
        glEnable(GL_DEPTH_TEST)
        glShadeModel(GL_SMOOTH)
        glMatrixMode(GL_PROJECTION)
        glLoadIdentity()
        gluPerspective(37, 1.3, 0.1, 100.0)
        glMatrixMode(GL_MODELVIEW)

        # assign shapes
        self.obj['banana'] = OBJ('OBJs/banana.obj')
        self.obj['arrow'] = OBJ('OBJs/arrow.obj')
        self.obj['flag'] = OBJ('OBJs/flag.obj')
        self.obj['star'] = OBJ('OBJs/star.obj')

        # assign texture
        glEnable(GL_TEXTURE_2D)
        self.texture_background = glGenTextures(1)

    def clear_buffers(self):
        glClear(GL_COLOR_BUFFER_BIT | GL_DEPTH_BUFFER_BIT)
        glLoadIdentity()

    def draw_background(self, image):
        bg_image = cv2.flip(image, 0)
        bg_image = Image.fromarray(bg_image)
        ix = bg_image.size[0]
        iy = bg_image.size[1]
        bg_image = bg_image.tobytes("raw", "BGRX", 0, -1)

        # create background texture
        glBindTexture(GL_TEXTURE_2D, self.texture_background)
        glTexParameterf(GL_TEXTURE_2D, GL_TEXTURE_MAG_FILTER, GL_NEAREST)
        glTexParameterf(GL_TEXTURE_2D, GL_TEXTURE_MIN_FILTER, GL_NEAREST)
        glTexImage2D(GL_TEXTURE_2D, 0, 3, ix, iy, 0, GL_RGBA, GL_UNSIGNED_BYTE, bg_image)
        glBindTexture(GL_TEXTURE_2D, self.texture_background)

        glPushMatrix()
        glTranslatef(0.0,0.0,-10.0)
        glBegin(GL_QUADS)
        glTexCoord2f(0.0, 1.0); glVertex3f(-4.0, -3.0, 0.0)
        glTexCoord2f(1.0, 1.0); glVertex3f( 4.0, -3.0, 0.0)
        glTexCoord2f(1.0, 0.0); glVertex3f( 4.0,  3.0, 0.0)
        glTexCoord2f(0.0, 0.0); glVertex3f(-4.0,  3.0, 0.0)
        glEnd( )
        glPopMatrix()

    def draw_obj(self, view_matrix, obj_id):
        glPushMatrix()
        glLoadMatrixd(view_matrix)
        if obj_id == 0:
                glScaled(0.1, 0.1, 0.1)
                glRotated(-90, 1, 0, 0)
                glTranslated(0.0,12.0,0.0)
                glCallList(self.obj['banana'].gl_list)
        elif obj_id == 1:
                #star
                glScaled(0.5, 0.5, 0.5)
                glRotated(-90, 1, 0, 0)
                glTranslated(0.0,-2.0,0.0)
                glCallList(self.obj['star'].gl_list)
        elif obj_id == 2:
                #left arrow
                glScaled(0.5, 0.5, 0.5)
                glRotated(-90, 1, 0, 0)
                glTranslated(0.0,2.0,0.0)
                glCallList(self.obj['arrow'].gl_list)
        elif obj_id == 3:
                #right arrow
                glScaled(0.5, 0.5, 0.5)
                glRotated(90, 1, 0, 0)
                glTranslated(0.0,-2.0,0.0)
                glCallList(self.obj['arrow'].gl_list)
        elif obj_id == 4:
                #checker sign
                glScaled(0.15, 0.15, 0.15)
                glRotated(-90, 1, 0, 0)
                glCallList(self.obj['flag'].gl_list)
        glPopMatrix()
# pikartpkg/pikartinteractions.py

import numpy as np

class PiKartInteractions:

    def __init__(self):
        self.sq_thresh = 50

    def check_collision(self, tvecs):
        tvecs = tvecs.flatten()
        sq_distance = tvecs[0]**2 + tvecs[1]**2 + tvecs[2]**2
        if sq_distance < self.sq_thresh:
            return True
        return False

    def hit_event(self, obj_id, banana_ev, star_ev):
        if obj_id == 0:
            banana_ev.set()
        elif obj_id == 1:
            star_ev.set()
#pikartpkg/objloader.py
#from https://github.com/yarolig/OBJFileLoader/blob/master/OBJFileLoader/objloader.py
import os
import pygame
from OpenGL.GL import *


class OBJ:
    generate_on_init = True
    @classmethod
    def loadTexture(cls, imagefile):
        surf = pygame.image.load(imagefile)
        image = pygame.image.tostring(surf, 'RGBA', 1)
        ix, iy = surf.get_rect().size
        texid = glGenTextures(1)
        glBindTexture(GL_TEXTURE_2D, texid)
        glTexParameteri(GL_TEXTURE_2D, GL_TEXTURE_MIN_FILTER, GL_LINEAR)
        glTexParameteri(GL_TEXTURE_2D, GL_TEXTURE_MAG_FILTER, GL_LINEAR)
        glTexImage2D(GL_TEXTURE_2D, 0, GL_RGBA, ix, iy, 0, GL_RGBA, GL_UNSIGNED_BYTE, image)
        return texid

    @classmethod
    def loadMaterial(cls, filename):
        contents = {}
        mtl = None
        dirname = os.path.dirname(filename)

        for line in open(filename, "r"):
            if line.startswith('#'): continue
            values = line.split()
            if not values: continue
            if values[0] == 'newmtl':
                mtl = contents[values[1]] = {}
            elif mtl is None:
                raise ValueError("mtl file doesn't start with newmtl stmt")
            elif values[0] == 'map_Kd':
                # load the texture referred to by this declaration
                mtl[values[0]] = values[1]
                imagefile = os.path.join(dirname, mtl['map_Kd'])
                mtl['texture_Kd'] = cls.loadTexture(imagefile)
            else:
                mtl[values[0]] = list(map(float, values[1:]))
        return contents

    def __init__(self, filename, swapyz=False):
        """Loads a Wavefront OBJ file. """
        self.vertices = []
        self.normals = []
        self.texcoords = []
        self.faces = []
        self.gl_list = 0
        dirname = os.path.dirname(filename)

        material = None
        for line in open(filename, "r"):
            if line.startswith('#'): continue
            values = line.split()
            if not values: continue
            if values[0] == 'v':
                v = list(map(float, values[1:4]))
                if swapyz:
                    v = v[0], v[2], v[1]
                self.vertices.append(v)
            elif values[0] == 'vn':
                v = list(map(float, values[1:4]))
                if swapyz:
                    v = v[0], v[2], v[1]
                self.normals.append(v)
            elif values[0] == 'vt':
                self.texcoords.append(list(map(float, values[1:3])))
            elif values[0] in ('usemtl', 'usemat'):
                material = values[1]
            elif values[0] == 'mtllib':
                self.mtl = self.loadMaterial(os.path.join(dirname, values[1]))
            elif values[0] == 'f':
                face = []
                texcoords = []
                norms = []
                for v in values[1:]:
                    w = v.split('/')
                    face.append(int(w[0]))
                    if len(w) >= 2 and len(w[1]) > 0:
                        texcoords.append(int(w[1]))
                    else:
                        texcoords.append(0)
                    if len(w) >= 3 and len(w[2]) > 0:
                        norms.append(int(w[2]))
                    else:
                        norms.append(0)
                self.faces.append((face, norms, texcoords, material))
        if self.generate_on_init:
            self.generate()

    def generate(self):
        self.gl_list = glGenLists(1)
        glNewList(self.gl_list, GL_COMPILE)
        #glEnable(GL_TEXTURE_2D)
        glFrontFace(GL_CCW)
        for face in self.faces:
            vertices, normals, texture_coords, material = face

            mtl = self.mtl[material]
            if 'texture_Kd' in mtl:
                # use diffuse texmap
                glBindTexture(GL_TEXTURE_2D, mtl['texture_Kd'])
            else:
                # just use diffuse colour
                glColor(*mtl['Kd'])
                #glColor((1.000000,1.000000,1.000000))
                #pass

            glBegin(GL_POLYGON)
            for i in range(len(vertices)):
                if normals[i] > 0:
                    glNormal3fv(self.normals[normals[i] - 1])
                if texture_coords[i] > 0:
                    glTexCoord2fv(self.texcoords[texture_coords[i] - 1])
                glVertex3fv(self.vertices[vertices[i] - 1])
            glEnd()
        #glDisable(GL_TEXTURE_2D)
        glEndList()

    def render(self):
        glCallList(self.gl_list)

    def free(self):
        glDeleteLists([self.gl_list])